
CDL Driveshaft Inspection Guide: U-Joints, Carrier Bearings and Warning Signs
The driveline carries engine torque toward the drive axles. A bent shaft, loose universal joint or failed carrier bearing can begin as a vibration and develop into a loss-of-control, roadside-breakdown or underbody-damage event.
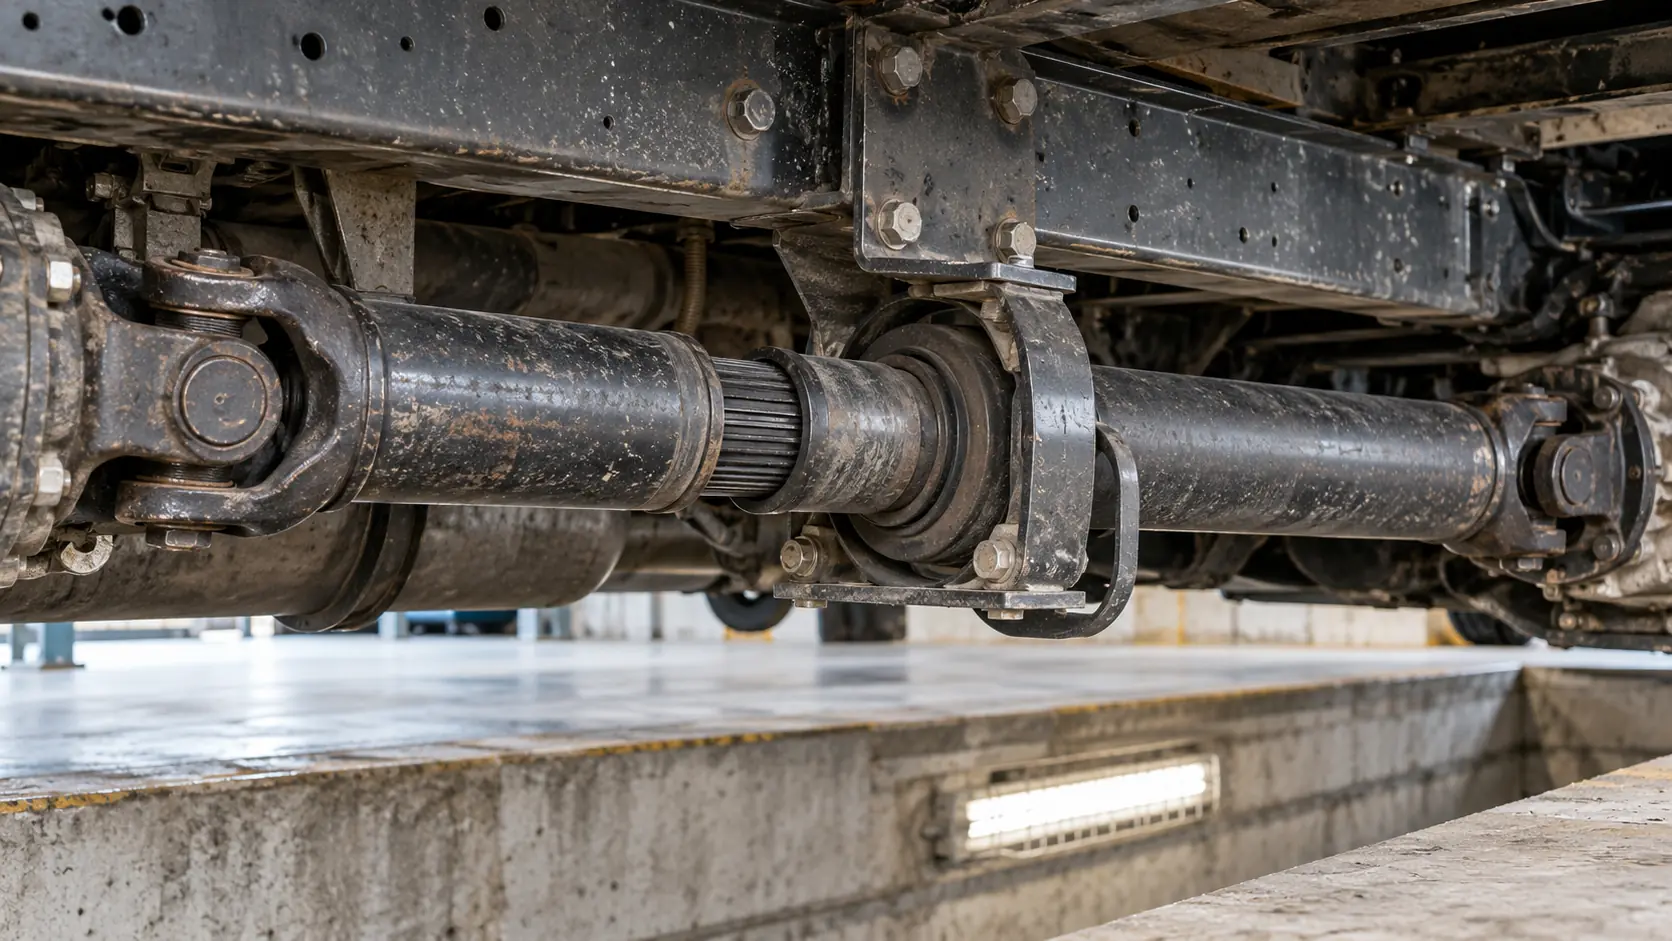
A truck’s driveshaft is easy to overlook because much of it sits low between the frame rails. It also rotates rapidly whenever the vehicle moves. That combination makes a disciplined inspection important: observe only from safe positions, know the main components and treat any new vibration or impact evidence as information that deserves action.
49 CFR 396.13 requires a driver to be satisfied that the vehicle is in safe operating condition before driving. The carrier has the continuing duty under 49 CFR 396.3 to systematically inspect, repair and maintain the vehicle and every additional part that may affect safe operation.
Know the driveline components you are viewing
| Component | Purpose | Visible concerns |
|---|---|---|
| Driveshaft tube | Transfers rotating torque along the chassis. | Bends, cracks, major dents, fresh impact marks, missing balance weights or evidence of contact. |
| Universal joint and yokes | Allow the driveline to operate as angles change. | Loose or displaced caps, missing retainers, damaged yokes, red rust at bearing caps or abnormal movement. |
| Slip joint | Allows the shaft length to change as the suspension and driveline move. | Damaged splines or boot, unusual extension, contamination, looseness or signs of binding. |
| Carrier bearing | Supports an intermediate shaft on a multi-piece driveline. | Loose bracket, missing fasteners, torn or displaced rubber support, off-center shaft or contact marks. |
| Guard or safety loop | Helps contain or control a shaft section if equipped and required by the vehicle design. | Loose, bent, missing or positioned so it contacts the rotating shaft. |
| Nearby frame and routing | Supports the driveline and keeps other systems clear. | Cracked crossmember, loose mount, or hoses, wiring and shields rubbing the shaft. |
Not every truck uses the same layout. A short straight truck may have one shaft; a long-wheelbase tractor may use several sections and one or more carrier bearings. Identify the actual path from transmission output toward the differential rather than memorizing one photograph.
Secure the vehicle before looking underneath
A driveshaft inspection never begins with the engine running or the truck able to roll. Park on a firm, level surface when available, place the transmission in the prescribed secure position, apply the parking brakes and use wheel chocks or the facility’s lockout procedure when required. Control the key so another person cannot start or move the truck.
Stay outside pinch points and never touch a shaft that could rotate. Do not crawl under a truck at the roadside or rely on air suspension, a jack or a parking brake as the only protection. A service pit or lift belongs to trained personnel following the shop’s support and energy-control rules.
A practical visual inspection sequence
- Start with the path. From a safe side view, locate the transmission output, each shaft section, any carrier bearing and the connection toward the differential.
- Scan each tube. Look along the length for a bowed profile, cracks, significant dents, twisting, impact scars or fresh shiny contact areas.
- Check the joint areas. Confirm that yokes, bearing caps and visible retainers appear present, aligned and secure. Look for reddish powder, displaced seals or thrown grease.
- Inspect the slip section. Check visible splines, dust boot and yoke for damage, contamination, abnormal extension or metal-to-metal contact.
- Inspect every support. A carrier bearing should sit squarely in an intact support with secure bracket hardware and no obvious separation.
- Check guards and clearance. Verify that loops or guards are secure and that hoses, wiring, heat shields and frame parts cannot rub the shaft.
- Finish with the surrounding structure. Look at the supporting crossmember and nearby frame for cracks, missing fasteners, distortion or fresh movement marks.
The current federal Class A ELDT curriculum requires instruction and demonstrated proficiency in pre-trip, enroute and post-trip inspections. It does not replace vehicle-specific procedures. Your State’s current CDL checklist, employer policy and manufacturer information determine the exact inspection language and access points for the truck you use.
How to describe the driveshaft during a CDL inspection
A clear explanation names the component, condition and safety purpose. For example:
“The driveshaft is not visibly bent, cracked or damaged. The universal-joint connections and retainers appear present and secure, the carrier bearing and bracket are firmly mounted, and no foreign object, hose or wire can contact the shaft.”
Do not claim to have checked a part you cannot see. Testing procedures vary by jurisdiction, and some modernized test checklists focus on a defined group of safety-critical items rather than every component. Follow the examiner’s instructions and the current official manual for your State.
Warning signs that matter during the trip
The driveline may reveal a developing problem before it becomes visible during a walkaround. Pay attention to changes rather than accepting a new symptom as “normal for this truck.”
- Speed-related vibration: a vibration that rises or changes with road speed can indicate imbalance, joint wear, shaft damage or another rotating-component problem.
- Clunk on takeoff or direction change: looseness may be present in a U-joint, slip joint, mount or differential connection.
- Squeak, chirp or grinding: a joint or bearing may be dry, contaminated or failing.
- Shudder under load: driveline angle, joint, mount or shaft problems may become more noticeable during acceleration.
- Fresh underbody strike: debris, a high-center event or failed component can dent the shaft or damage a guard and nearby systems.
These symptoms are not a roadside diagnosis. Slow and stop at a safe location, communicate the symptom precisely and obtain qualified inspection. Continuing to “see if it clears up” can turn a repairable defect into a separated shaft or wider underbody damage.
What requires a stop-and-report decision?
Do not move the vehicle when the shaft is visibly bent or cracked, a U-joint cap or retainer is missing, a carrier bearing is displaced, a guard is contacting the shaft, or the driveline can strike a hose, wire, brake component or frame member. New severe vibration, grinding or repeated clunking also requires a professional decision before continued operation.
Under 49 CFR 396.11, a driver’s report must identify a discovered defect that could affect safe operation or cause mechanical breakdown when a DVIR is required. Write the location and symptom: “front carrier-bearing bracket loose with fresh movement marks” is more actionable than “driveshaft bad.” The ProntoCDL post-trip and DVIR guide explains the reporting workflow.
Common inspection mistakes
- Looking only at the center of the tube. Many visible clues appear at joint caps, yokes, support rubber and mounting hardware.
- Grabbing or rotating the shaft. A driver walkaround is visual unless an approved procedure explicitly authorizes a hands-on check.
- Ignoring a new vibration. Tire, wheel and driveline problems can feel similar; the correct response is a safe stop and qualified diagnosis.
- Calling every grease mark a leak. Record what you actually see—wet spray, thrown grease, red dust, missing seal or fresh contact—without guessing at the cause.
- Entering an unsafe space for a better view. If a component cannot be inspected safely, escalate it to maintenance rather than crawling under an unsecured vehicle.
Build the driveline into a complete inspection
Inspect the driveshaft while moving between the driver-side fuel area and the drive-axle zone so it becomes part of a repeatable route. Continue with the steering and suspension inspection, engine-compartment check and wheel and rim inspection. If a defect leads to an enforcement inspection or repair order, review the roadside-inspection guide.
Practical takeaways
- Secure the truck and control the key before viewing the driveline.
- Inspect every shaft section, U-joint, slip joint, carrier bearing, guard and supporting crossmember.
- Look for straightness, secure hardware, intact supports and clearance from nearby systems.
- Never crawl under an unsupported or unsecured commercial vehicle.
- Treat new vibration, clunking, grinding or shudder as a reason to stop and investigate.
- Describe the exact location and visible symptom when reporting a defect.
- Use the current State checklist and vehicle-specific procedure rather than memorizing one universal layout.
CDL driveshaft inspection FAQ
What should a CDL driver check on a driveshaft?
From a safe viewing position, check that the shaft tube is straight and free of cracks or major dents, the yokes and universal-joint retainers appear secure, the slip-joint area is intact, the carrier bearing and bracket are firmly mounted, and no guard, hose or wire can contact the rotating driveline.
May a driver crawl under a commercial truck during a pre-trip?
Do not crawl beneath a vehicle unless it has been secured under an approved shop procedure with the correct energy-control and support measures. A roadside or routine walkaround should use safely visible inspection points; ask qualified maintenance personnel to inspect areas that cannot be seen safely.
What driveline symptoms should stop a trip?
New heavy vibration, repeated clunking, grinding, a loose or displaced carrier bearing, a visibly bent or cracked shaft, missing joint retainers, or evidence that a rotating part is striking the frame requires a stop and qualified inspection before continued operation.
Is a little driveshaft surface rust automatically a failure?
Light surface discoloration is not the same as a structural crack, deep scaling, impact damage or looseness. Do not scrape or strike components to diagnose them. Record the location and let qualified maintenance personnel determine severity when the condition is uncertain.
Does every truck use the same driveshaft arrangement?
No. Wheelbase, transmission, axle configuration and manufacturer design affect the number of shaft sections, universal joints, slip joints and carrier bearings. Inspect the equipment actually installed and follow the vehicle and carrier procedures.
Should a driveline defect go on a DVIR?
A discovered defect or deficiency that could affect safe operation or cause mechanical breakdown should be reported through the carrier process. Federal DVIR rules require listed safety or breakdown defects to be documented when a report is required.
Practice a safe, complete inspection route.
Learn the system, describe what you see and never trade personal safety for a closer look.
Start free CDL practice