
CDL Rear Impact Guard Inspection: Damage, Mounts & Clearance
The bar beneath the rear of a trailer is a structural crash-protection device, not a step, tow point or place for a temporary patch. A useful driver inspection follows the entire load path—from the horizontal member through its supports and attachments to the trailer frame—then checks whether damage has changed the guard’s position.
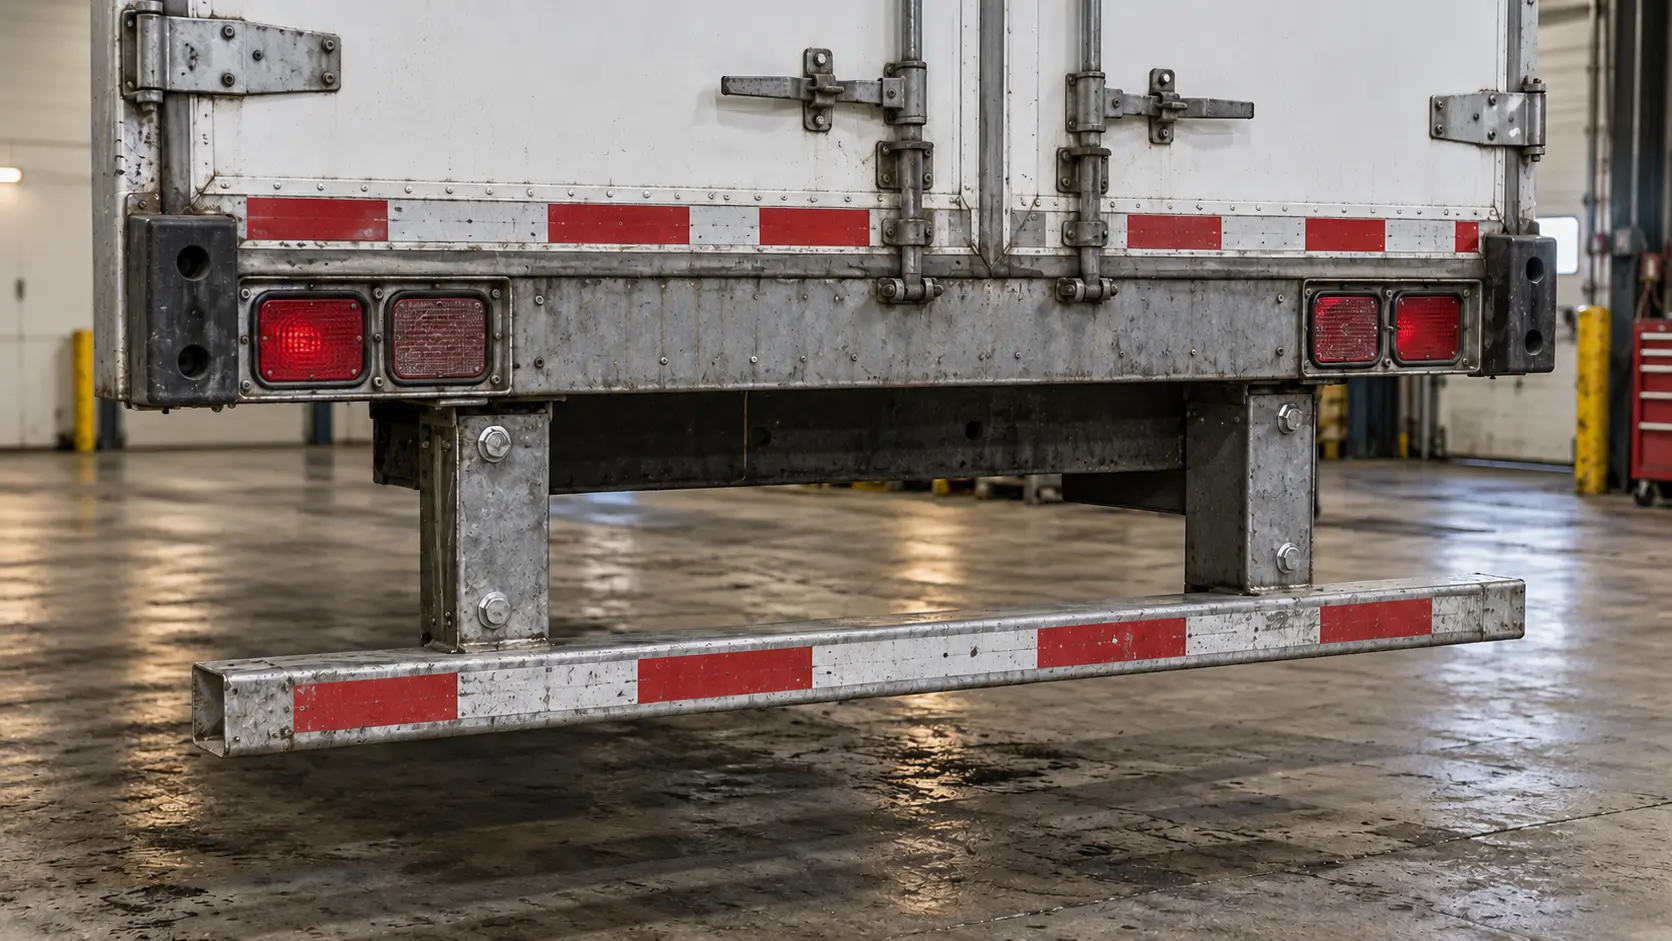
This guide turns the federal maintenance criteria in 49 CFR 393.86 and Appendix A to Part 396 into a practical walkaround. Use it with the ProntoCDL frame inspection guide, lighting and conspicuity guide and post-trip and DVIR guide.
What the rear impact guard does
The rear impact guard is designed to limit underride when a smaller vehicle strikes the back of a trailer or semitrailer. The horizontal member presents the contact surface. Its vertical supports and attachment structure transfer collision force into the trailer chassis. A bar that looks straight can still be unsafe when a support is cracked, a mounting plate has separated or the trailer structure around the attachment has failed.
FMVSS 223 sets strength, energy-absorption, labeling and installation-instruction requirements for the guard. FMVSS 224 governs the guard’s installation on covered trailers. Drivers are not expected to perform destructive tests; their job is to recognize missing, loose, cracked, bent or badly positioned equipment and report it precisely.
Which trailers are covered?
For trailers and semitrailers with a GVWR of 10,000 pounds or more manufactured on or after January 26, 1998, 49 CFR 393.86 generally requires a guard meeting the FMVSS 223 standard in effect when it was made and an installation meeting the applicable FMVSS 224 requirements. The rule lists exceptions, including certain pole, pulpwood, low-chassis, special-purpose and wheels-back vehicles, road-construction controlled-horizontal-discharge trailers and trailers in driveaway-towaway operations.
Older covered motor vehicles use a different dimensional framework. This is why a driver should identify the unit, manufacture date and configuration before declaring that a different-looking guard is illegal. When coverage is unclear, report the question to maintenance or compliance; do not invent an exemption during the walkaround.
The common post-1998 periodic-inspection limits
| Inspection point | Federal periodic-inspection criterion | Driver’s visual clue |
|---|---|---|
| Presence and attachment | Guard present and securely attached; no broken or missing fasteners, cracked welds or parent metal, or damage compromising attachment | Missing hardware, fresh gaps, shifted plates, torn metal, cracked paint following a weld or movement marks |
| Width | Horizontal member reaches within 4 inches of each side extremity and does not extend beyond either side | One end pushed inward, shortened, replaced with the wrong bar or projecting past the body |
| Ground clearance | Bottom of horizontal member no more than 22 inches above the ground | Bar bent upward, trailer ride height abnormal or one end visibly higher than the other |
| Rear position | Horizontal member no more than 12 inches forward of the rear extremity | Guard folded forward, supports deformed or replacement mounted too far beneath the trailer |
| Member height | Horizontal member has a vertical cross-section at least 4 inches high across its width | Crushed, cut-down, severely corroded or nonstandard replacement section |
These numbers describe the common covered post-1998 trailer category and include rounded-corner details not fully reproduced here. They are not a universal template for every vehicle. A driver can use them to recognize an obvious problem, while a qualified inspector or technician makes the formal measurement and coverage decision.
A repeatable walkaround sequence
- Secure the combination. Park on firm, level ground, set the parking brakes and stay out from under unsupported or moving equipment.
- Stand back for the overall shape. Compare both ends of the horizontal member. Look for tilt, twist, forward fold, uneven height or a bar that no longer follows the trailer’s rear plane.
- Scan the horizontal member end to end. Check the face, top, bottom and end caps for cracks, deep bends, crushed sections, holes, missing pieces and heavy corrosion.
- Trace each vertical support. Follow the load path from the bar upward. Inspect support tubes, gussets and brackets for buckling, tears, old impact distortion and questionable repairs.
- Inspect fasteners and welds. Look for missing bolts, backed-off nuts, elongated holes, polished movement marks, cracked welds and cracks extending into the parent metal.
- Check the trailer structure. A sound-looking guard is not secure if the rear sill, frame connection or mounting surface is cracked, distorted or corroded through.
- Evaluate position and clearance. Confirm the guard is close to the rear, low enough, wide enough and not projecting dangerously beyond the trailer sides. Use a proper measurement when the condition is questionable.
- Finish with adjacent equipment. Check tail, stop and turn lamps, reflectors, conspicuity tape, door hardware and the license-plate mount without treating them as substitutes for guard integrity.
How to inspect without creating another hazard
Do not crawl under a trailer during a routine driver walkaround. Use a flashlight and change your viewing angle from outside the vehicle footprint. Never kick the guard, hang on it or stand on it to “test” strength. Those actions cannot prove compliance and can worsen hidden damage.
If the guard is close to a dock, wall, traffic lane or another trailer, move only under a controlled plan or ask for a safer inspection position. A missing view is not permission to guess. The same secure-vehicle discipline used for a fifth-wheel coupling inspection applies at the rear.
Damage clues that deserve an immediate report
- a missing guard, support, bracket, bolt or nut;
- a cracked weld, torn mounting plate or crack in the surrounding trailer metal;
- a horizontal member that is sharply bent, twisted, crushed or folded forward;
- perforating corrosion, flaking structural metal or a visibly thinned support;
- fresh scrape marks, polished metal or shifted washers showing recent movement;
- one end higher, farther forward or farther inward than the other;
- a cut, drilled, spliced or improvised repair with no verified maintenance approval; or
- impact damage near lamps, wiring, door hardware or the trailer frame.
A fresh rear impact can transmit force beyond the guard. Even when the bar remains attached, inspect the rear sill, crossmembers, door frame, wiring and nearby conspicuity material. The roadside inspection guide explains how to keep documents and defect information ready if the unit is examined.
Measure only after the visual check
A tape measure can confirm a concern, but the setup matters. For the post-1998 trailer framework, FMVSS 224 describes a trailer on level ground, unloaded, with tires inflated and air suspension—if equipped—pressurized according to the manufacturer’s recommendations. A dropped suspension, sloped yard or curb can produce a misleading ground-clearance number.
Measure the bottom edge of the horizontal member to the ground, the guard’s rear surface to the defined rear extremity and each outer end to the trailer side extremity. Record the exact location and number. “Bumper too high” is less useful than “right end measured approximately 24 inches from level pavement; air suspension at normal ride height.”
Reporting and repair decisions
49 CFR 396.13 requires a driver to be satisfied that the vehicle is in safe operating condition before driving and to review the last required vehicle inspection report. Under 49 CFR 396.11, a discovered defect affecting safe operation must be identified accurately so the carrier can make and certify the required repair decision.
Do not make a structural guard usable with straps, chains, wire, wood, a field weld or an unapproved bolt. Photograph the entire rear, then the defect and its attachment area; record the trailer number, side, component, condition and observed movement or measurement. Keep the unit secured until maintenance or the carrier’s authorized decision-maker responds.
Practical takeaways
- Treat the rear impact guard as a structural crash-protection system, not a bumper accessory.
- Start with overall alignment, then trace the bar, supports, fasteners, welds and trailer attachment structure.
- For common covered post-1998 heavy trailers, remember 4 inches at the sides, 22 inches to the ground, 12 inches from the rear and a 4-inch-high member.
- Confirm vehicle type and manufacture date before applying one set of dimensions to every trailer.
- Use level ground and the correct ride-height condition before relying on a clearance measurement.
- Describe the exact damage and location; “bad bumper” does not give maintenance enough information.
- Never improvise a structural repair or crawl beneath unsupported equipment during a driver inspection.
CDL rear impact guard inspection FAQ
Is a trailer rear impact guard the same as an ICC bumper?
Drivers often call it an ICC bumper or underride guard. The current federal rules use the term rear impact guard. Its purpose is to limit how far the front of a smaller vehicle can travel under the rear of a trailer during a collision.
Does every trailer need a rear impact guard?
No. Coverage depends on vehicle type, configuration, gross vehicle weight rating and manufacture date. Federal exceptions include certain pole, pulpwood, low-chassis, special-purpose and wheels-back vehicles. Do not assume that an unfamiliar design is exempt; verify it through the carrier or maintenance department.
What are the main federal dimensions for a heavy trailer built on or after January 26, 1998?
For the common covered trailer, the horizontal member must reach within 4 inches of each side without extending beyond the vehicle, remain no more than 22 inches above the ground, sit no more than 12 inches forward of the rear extremity and have a vertical cross-section at least 4 inches high. Rounded-corner provisions can affect the outer ends.
Can a driver measure rear-guard height on sloped ground?
A quick walkaround can identify obvious damage, but a compliance measurement should use level ground and the correct vehicle condition. FMVSS 224 specifies an unloaded trailer on level ground with tires and air suspension set according to manufacturer recommendations.
Is surface rust automatically a rear-impact-guard failure?
Light surface oxidation is not the same as a failed guard. The important questions are whether corrosion has reduced the structural metal, opened holes, weakened a weld or attachment, or changed the guard position. Report the location and extent instead of writing only “rusty.”
May a driver straighten or weld a bent guard during a pre-trip?
Not as an improvised roadside repair. The guard is a structural safety device with certified attachment and performance requirements. Secure the vehicle, report the defect and let qualified maintenance personnel determine the correct repair or replacement.
Practice the load-path inspection.
Start at the horizontal member, follow both supports to the trailer structure and turn every damage clue into a precise report.
Start free CDL practice