
CDL Coupling & Uncoupling Guide: Fifth Wheel, Lines and Landing Gear
A safe hookup is a sequence, not a single click. Learn how to set trailer height, make the connection, prove the fifth-wheel lock, protect the lines and leave an uncoupled trailer stable.
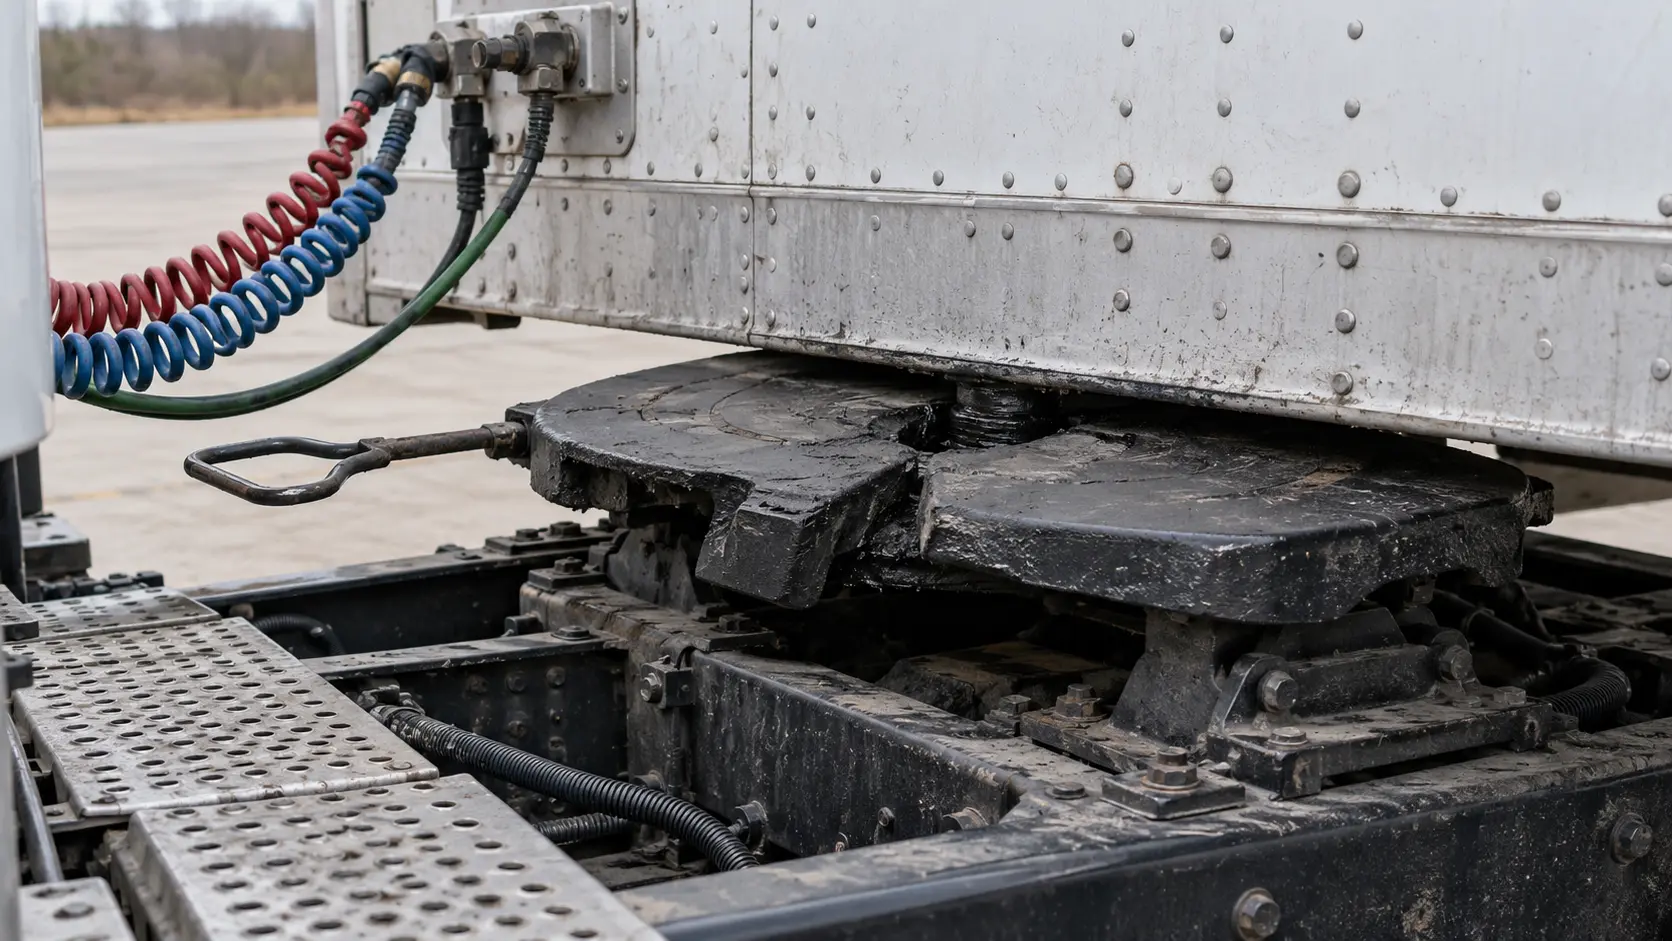
Federal CDL knowledge standards require combination-vehicle drivers to know the proper procedures for coupling and uncoupling a tractor and semitrailer. The Class A ELDT curriculum goes further: it requires instruction in the process and behind-the-wheel range proficiency in coupling, inspecting and uncoupling, as applicable.
That emphasis makes sense. A tractor and trailer can appear connected while the kingpin rests on top of closed jaws, air lines are crossed or the landing gear is not ready for travel. A reliable driver uses several independent checks before moving onto the road.
This guide presents the general sequence for a conventional tractor-semitrailer. Equipment designs, yard controls, manufacturer instructions, carrier policies and licensing-State test steps vary. Learn the exact procedure for the tractor and trailer you will operate.
Think in phases, not isolated parts
| Phase | Primary question | Stop condition |
|---|---|---|
| Prepare | Are the area, trailer, fifth wheel and lines ready? | Movement risk, damage, bad alignment or unstable ground |
| Approach | Will the fifth wheel lift and capture the kingpin correctly? | Trailer too high or low, tractor off-center |
| Connect | Did the jaws lock around the kingpin shank? | Gap, failed visual check or abnormal handle position |
| Finish | Are lines, landing gear and clearances ready for a turn? | Leak, poor routing, incomplete retraction or interference |
| Uncouple | Can the trailer stand safely after the tractor leaves? | Weak surface, moving trailer or damaged support |
Do not allow schedule pressure to blend those phases together. Every time the driver leaves the seat, the tractor must be secured against unintended movement before the driver enters the space between the units.
1. Inspect the coupling system before backing
Walk the intended path and clear people, chocks, debris and movable equipment. Confirm the trailer identification and that cargo will not shift when the tractor contacts the trailer. The trailer wheels must be restrained by functioning spring brakes or chocks as the equipment and procedure require.
Inspect the lower fifth wheel before it disappears beneath the trailer:
- mounting brackets, plate and fasteners are secure, with no missing parts or frame cracks;
- the plate is lubricated as required and tilted down toward the rear for the approach;
- the throat is clear, the locking jaws are open and the release mechanism is ready to lock;
- a sliding fifth wheel is fully pinned and locked; and
- the visible trailer apron and kingpin are not bent, cracked or contaminated with debris.
Federal fifth-wheel equipment rules require a locking mechanism that prevents separation unless positively released. They also require the lock to apply automatically on coupling when the fifth wheel is designed to be readily separable. ProntoCDL's fifth-wheel inspection guide covers the individual parts in more depth.
2. Align the tractor squarely with the trailer
Position the tractor directly in front of the trailer. Use both mirrors to compare the tractor frame with both trailer sides. Backing in at an angle can push the trailer sideways, load the landing gear unevenly and place the kingpin outside the center of the fifth-wheel throat.
Back slowly until the fifth wheel just contacts the trailer apron, then stop. Secure the tractor with the parking brake and transmission in neutral before leaving the cab. The slow approach is deliberate: it gives the driver time to correct alignment without striking the trailer nose or landing gear.
If the view or path becomes uncertain, stop and get out to look. Repositioning is professional control, not a failed attempt. The same disciplined backing habits appear in ProntoCDL's GOAL and spotter guide.
3. Set the trailer height before the final approach
The trailer should be low enough that the tractor raises it slightly as the fifth wheel slides beneath the upper apron. That contact transfers weight onto the fifth wheel and brings the kingpin through the throat at the correct height.
- Too high: the fifth wheel may pass under the apron while the kingpin rides over or on top of the jaws, creating a high hook.
- Too low: the tractor frame or fifth wheel can strike and damage the trailer nose or fail to pass beneath it.
- Not centered: the kingpin can miss the throat and the tractor can push the trailer sideways.
If adjustment is needed, secure both units and use the landing gear correctly. Do not try to solve a wrong height with speed or impact. Inspect the supports and crank before applying force; ProntoCDL's landing-gear guide explains the load path, braces and feet.
4. Connect and protect the service lines
Use the sequence specified for the equipment and current test procedure. In the common CDL-manual sequence, inspect the glad-hand seals and connect the emergency supply line and service line before backing completely under the trailer. Supply air, build normal pressure and check for crossed lines or leaks as directed.
Route hoses so they have enough slack for a full turn but cannot be crushed between the tractor and trailer, snagged on the deck or stretched tight. Match function to connection; color is a helpful identifier, not a substitute for knowing the installed system. Keep the electrical cable protected until its connection step.
Stop for damaged seals, cracked couplers, severe abrasion, a kink, an audible leak or a connection that will not seat and retain. See ProntoCDL's air-line and glad-hand inspection guide for a complete trace of each hose and fitting.
5. Back under slowly and listen for the lock
Return to the cab, verify the path and use the lowest reverse gear. Back slowly beneath the trailer until the kingpin enters the fifth-wheel throat and the mechanism locks. Avoid hitting the kingpin hard; impact is not proof of a correct connection.
Apply the parking brake and secure the tractor. A sound or change in resistance can suggest engagement, but neither proves the jaws captured the kingpin shank. The proof comes from the next checks.
6. Use a gentle tug, then perform the visual inspection
With the trailer brakes applied, raise the landing gear only enough to clear the ground for the test. Gently pull forward to confirm the trailer resists separation. Stop immediately after the check and secure the tractor again.
The tug test is supplemental. Get out and inspect the mechanical connection directly:
- Use a flashlight if needed and approach only after the vehicle is secured.
- Confirm there is no visible space between the upper trailer apron and the lower fifth-wheel plate.
- Look into the rear of the fifth wheel and confirm the jaws are closed around the shank of the kingpin, not beneath the head.
- Verify the release handle is fully seated in the locked position.
- Confirm the safety latch or secondary lock is engaged as designed.
If any check is uncertain, do not drive. A failed visual inspection is not corrected by a stronger tug. Secure the units, lower the trailer onto stable support, separate the tractor and repeat the setup from the beginning.
7. Finish the connections and raise the landing gear
Connect the electrical cord and secure its retaining catch. Inspect the air and electrical lines from both ends. They must be connected firmly, undamaged, supported and clear of the fifth wheel, frame, tires and every pinch point through a turn.
Raise the landing gear fully using the correct gear range. Secure the crank handle in its holder. Confirm the legs are fully retracted, braces are intact and there is enough clearance between the trailer nose and tractor frame or tires. Remove and store wheel chocks only after the combination is secure and the procedure directs.
Complete the combination-vehicle walkaround and brake checks before entering traffic. Federal 49 CFR 392.7 says a commercial vehicle must not be driven until the driver is satisfied that listed equipment—including trailer brake connections and coupling devices—is in good working order.
8. Make the final connection check turn-ready
A parked straight-ahead inspection is incomplete if the combination cannot turn safely. Before departure, verify:
- the fifth wheel remains fully seated and locked;
- air and electrical lines have safe slack without hanging low;
- the landing gear and crank are fully raised and secured;
- the tractor frame, mudflaps and tires have clearance from the trailer;
- the trailer nose has clearance from the cab through expected turns;
- trailer air reaches the system and brake response is normal; and
- lights and electrical functions operate as required.
Do not use the first road turn as a clearance test. If the sliding fifth wheel position, trailer design or line routing is unfamiliar, resolve the question in the yard.
Safe uncoupling reverses the load transfer carefully
Uncoupling is not simply the coupling list backward. The goal is to leave the trailer stable and to keep the tractor beneath it until support is proven.
- Choose the surface. Park straight on firm, level ground that can support the trailer and cargo.
- Secure the trailer. Shut off trailer air supply to apply the trailer brakes. Chock the wheels when the trailer lacks spring brakes or whenever the equipment, site or procedure requires it.
- Relieve jaw pressure. Back gently to ease tension on the locking jaws, then apply the tractor parking brake.
- Lower the landing gear. Make firm contact with the ground. For a loaded trailer, use the approved additional turns to transfer some weight without lifting the trailer off the fifth wheel.
- Disconnect and stow lines. Protect glad hands on dummy couplers or as designed and hang the electrical plug so moisture and damage are avoided.
- Unlock the fifth wheel. Release the safety lock and pull the handle fully open while keeping the body, legs and feet clear of wheel paths and movement zones.
- Pull partially clear. Move forward until the fifth wheel clears the kingpin, but leave the tractor frame beneath the trailer.
- Prove support. Stop, secure the tractor and confirm the landing gear and ground are carrying the trailer without sinking, leaning or damage.
- Pull clear. Check the area, release the tractor brakes and move away slowly.
That partial-clear stop is an important control. If the ground settles or a landing-gear problem appears, the tractor frame is still positioned to reduce the consequences while the driver stops the operation.
Recover from a bad hookup without improvising
Warning signs include a gap above the fifth wheel, jaws not visibly around the shank, a release handle that does not seat, landing gear carrying unexpected weight, an uneven trailer, leaking or crossed lines, and a tug test that allows separation.
When a check fails:
- stop and secure the tractor and trailer;
- keep people out of the space and travel path;
- support the trailer correctly with the landing gear;
- disconnect or protect lines as the procedure requires;
- separate the units slowly; and
- inspect for damage before beginning again from alignment and height.
Do not drive a questionable connection to another part of the yard for inspection. Do not strike the trailer harder, force a release handle or crawl beneath equipment that is not secured and supported.
Build the sequence into Class A CDL practice
Practice with a qualified instructor on the actual equipment used for training. Call out three things at each stop: the action, the expected condition and the reason. For example: “I am checking trailer height; the fifth wheel must lift the apron slightly; this prevents a high hook.”
Train the complete cycle rather than only the final tug. Federal Class A ELDT requires proficiency in coupling, inspecting and uncoupling. A trainee who can make the tractor connect but cannot prove the lock or leave the trailer safely supported has not mastered the task.
Coupling may not be a standalone segment of every licensing-State skills test, but the knowledge and inspection logic support the combination-vehicle test, pre-trip inspection and professional yard work. Review how the inspection fits into the broader exam in ProntoCDL's CDL skills-test guide.
Practical takeaways
- Clear the area and restrain the trailer before the tractor approaches.
- Inspect the fifth wheel, mounting, jaws, release, slider and kingpin before they are hidden.
- Align squarely and back slowly; never correct poor setup with impact.
- Set the trailer so the fifth wheel lifts it slightly during coupling.
- Keep air and electrical lines connected correctly, supported and out of pinch points.
- Use the tug test as one check, not the only check.
- Visually prove no gap, jaws around the shank, handle locked and safety latch engaged.
- Raise the landing gear fully, secure the crank and verify turn clearance.
- During uncoupling, prove trailer support while the tractor frame remains beneath it.
- Restart the sequence whenever height, alignment or lock condition is uncertain.
CDL coupling and uncoupling FAQ
How high should a trailer be before coupling?
Set the trailer low enough that the tractor raises it slightly as the fifth wheel slides beneath the upper apron. The fifth wheel must contact and lift the trailer rather than pass under a kingpin that is too high. Exact setup varies by equipment, so stop, secure the tractor and adjust the landing gear before continuing if height or alignment is wrong.
Is a tug test enough to prove the fifth wheel is locked?
No. A gentle tug against applied trailer brakes is a useful functional check, but it does not replace the direct visual inspection. Secure the combination and verify no gap between the upper and lower fifth wheel, jaws closed around the kingpin shank, the release handle in the locked position and the safety latch engaged as designed.
What is a high hook?
A high hook occurs when the trailer is too high and the kingpin rides on or ahead of the fifth-wheel jaws instead of entering the throat and locking correctly. Warning signs include a visible gap between the trailer apron and fifth wheel, an abnormal release-handle position or a failed visual lock check. Do not drive; secure the units, separate them and repeat the setup correctly.
When should the air lines and electrical cable be connected?
Many current CDL manuals direct drivers to inspect and connect the service and emergency air lines before backing fully beneath the trailer, then connect the electrical cord after the mechanical coupling is verified. Equipment and site procedures can differ. Follow the current licensing-State manual, manufacturer instructions and carrier procedure while keeping every line clear of pinch points.
Why stop with the tractor frame under the trailer when uncoupling?
After unlocking the fifth wheel, pull only far enough for the fifth wheel to clear the kingpin while the tractor frame remains beneath the trailer. Stop, secure the tractor and confirm the landing gear and ground are supporting the trailer. This creates a final opportunity to catch sinking, collapse or an incomplete support setup before the tractor pulls completely clear.
Does ELDT require coupling and uncoupling practice?
For a Class A CDL, the federal ELDT curriculum requires theory instruction in safe coupling and uncoupling and behind-the-wheel range proficiency in coupling, inspecting and uncoupling combination units, as applicable. Training providers determine proficiency; there is no federal minimum number of practice hours for this unit.
Practice the whole combination
Review the fifth-wheel inspection and air-line connections, then reinforce Class A concepts with ProntoCDL's CDL study guides and free practice center.