
CDL Dashboard Gauge Check: Readings, Warnings & Safe Stops
A dashboard check is not a quick glance for red lights. It is a sequence: identify the instruments, observe the key-on prove-out, watch the readings respond after startup, compare them with the assigned truck's normal range and act before a warning becomes a breakdown.
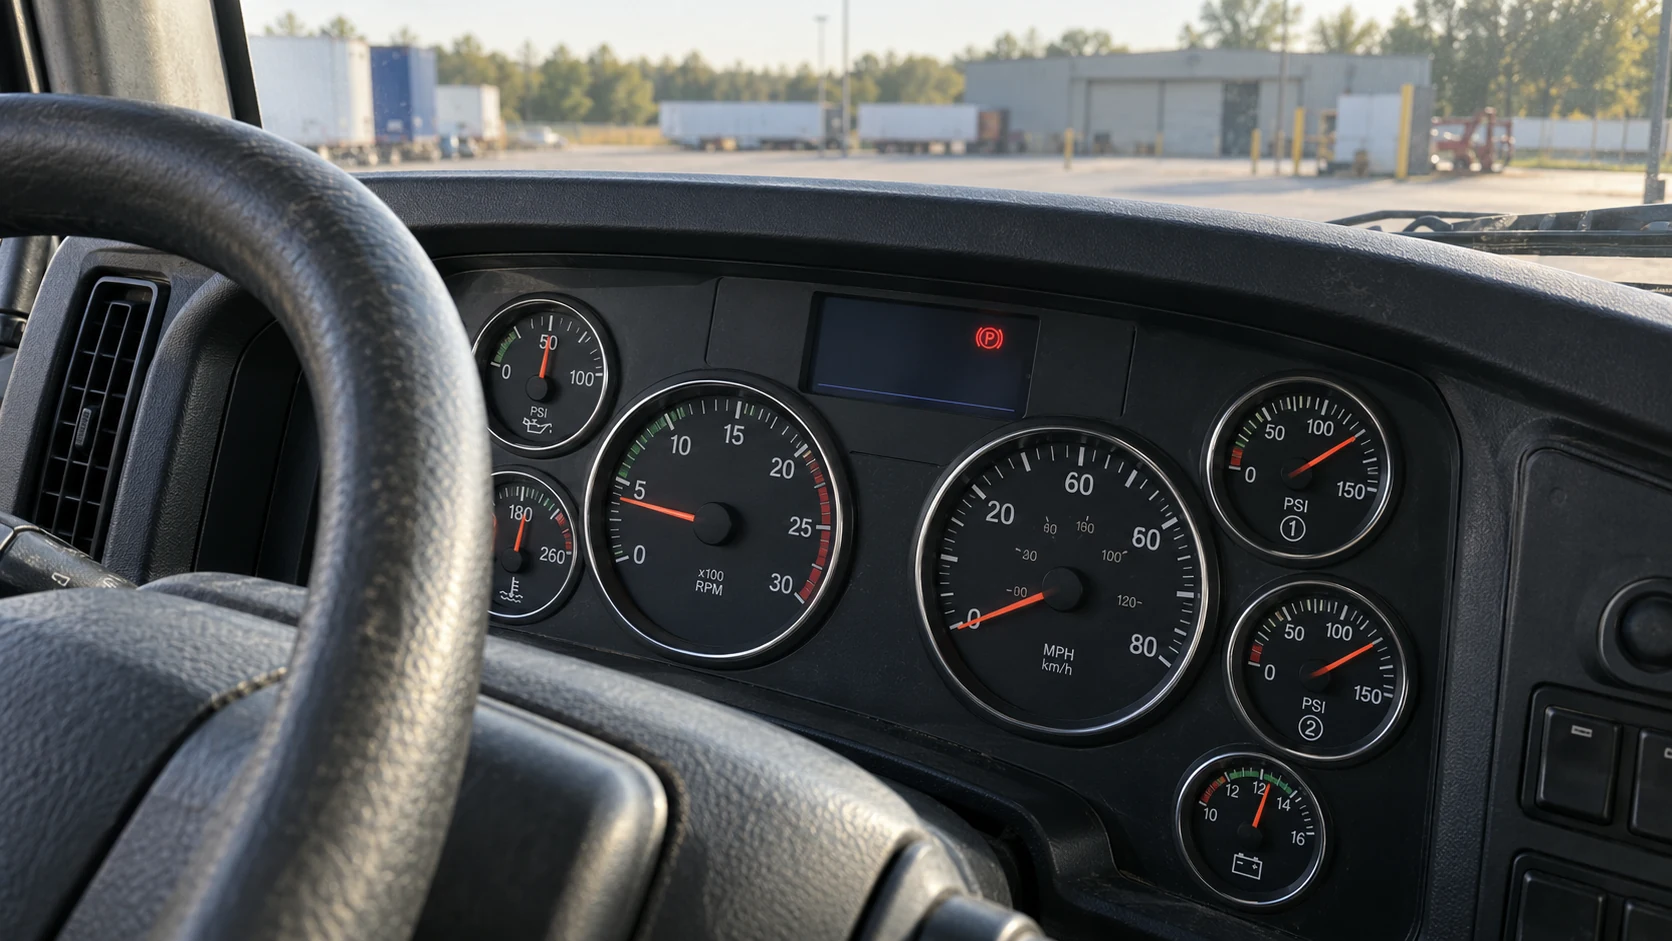
The federal Class A ELDT curriculum requires instruction in the correct use of dashboard instruments and controls. Federal equipment rules are more specific for some systems than others: 49 CFR 393.51 addresses brake-warning signals and air-pressure gauges, while oil, coolant and charging-system limits are primarily vehicle-specific. The professional habit is to know which rule, manufacturer range and carrier procedure applies instead of inventing one universal number.
Use this guide with ProntoCDL's air-brake test guide, ABS warning-lamp guide and engine-compartment inspection guide.
Know what each instrument can—and cannot—tell you
| Instrument or signal | What it helps monitor | Driver focus |
|---|---|---|
| Engine-oil pressure | Pressure in the lubrication system | Prompt response after startup, stable vehicle-specific range and any sudden drop or fluctuation |
| Coolant temperature | Engine heat trend | Gradual warm-up, normal operating range and an unexpected rise under similar conditions |
| Voltmeter or ammeter | Electrical-system voltage or charge flow | Normal charging indication, warning lamp status and changes when major electrical loads are applied |
| Primary and secondary air gauges | Brake-system reservoir pressure | Both circuits building, normal governor behavior, no unexplained loss and a functioning low-pressure warning |
| ABS lamps | Antilock-system prove-out and malfunction status | Correct startup sequence for the tractor and, when connected, the trailer |
| Fuel and DEF levels | Available fuel and diesel exhaust fluid | Trip sufficiency, plausible movement and any leak, cap or warning condition found outside |
| Tachometer and speedometer | Engine and road speed | Idle response, transmission operation, speed control and comparison with other operating clues |
A gauge is one piece of evidence, not a complete diagnosis. Normal oil pressure does not prove the oil level is correct. A full fuel gauge does not prove the tank, cap or lines are leak-free. A normal coolant reading immediately after a cold start does not prove the cooling system will control heat under load.
1. Learn the cluster before starting the engine
Sit in the normal driving position with the parking brake applied and the transmission in neutral or park, as appropriate. Locate each installed gauge, warning lamp, message area and audible alarm. Identify which air-pressure needle or gauge represents each service reservoir circuit. Find the manufacturer information for any icon or abbreviation you cannot explain.
Record the truck-specific operating ranges from the operator's manual, dash markings and approved fleet materials. A memorized number from another tractor may be wrong for a different engine, charging system or governor setting. A CDL explanation is strongest when it names both the condition and the source: “The coolant temperature is in the manufacturer's normal operating range,” not “every truck should read the same temperature.”
2. Use the key-on prove-out as a system check
Turn the electrical system on without rushing through the display. Many warning lamps illuminate briefly so the driver can confirm the lamp and circuit can signal. Observe which lamps appear, whether the message display completes its startup sequence and whether an expected buzzer sounds. Then compare the sequence with the actual vehicle manual.
Do not treat every illuminated symbol as a failure during prove-out, and do not assume every lamp must go dark in exactly the same number of seconds. The parking-brake indicator can remain on while the brake is set. Conversely, an important lamp that never illuminates may be just as meaningful as one that stays on.
3. Start the engine and watch oil pressure first
After a safe start, oil pressure should respond promptly and move into the range specified for the engine and operating state. Watch the gauge rather than immediately raising rpm, releasing brakes or reaching for another control. If pressure does not rise, drops unexpectedly or fluctuates abnormally, follow the shutdown procedure and report the problem before engine damage develops.
Connect the dash reading to the outside inspection. The dipstick or electronic level check verifies oil quantity; the gauge indicates system pressure after startup. Fresh oil beneath the engine, an abnormal sound and a low-pressure indication are related clues, but each deserves its own observation. Review the physical checks in the engine-compartment guide.
4. Confirm the charging indication
Observe the voltmeter, ammeter or electronic charging message before startup, during cranking and after the engine settles. A short change during cranking can be expected; the running indication should stabilize within the vehicle's approved range. Switch on a major electrical load only if the normal procedure calls for it, and confirm the system recovers appropriately.
Do not apply one universal voltage number to every commercial vehicle. System design, battery arrangement, temperature, charging strategy and operating state affect the reading. A charge-warning lamp, an out-of-range display, repeated resets, dimming lamps or a hot-electrical odor calls for a specific report and qualified evaluation.
5. Read coolant temperature as a trend
Coolant temperature normally rises gradually from a cold start toward the engine's operating range. The useful question is not only where the needle sits, but how it got there. A rapid rise, continued climb beyond the approved range, erratic movement, warning message, steam or coolant odor requires attention.
If overheating is suspected while driving, reduce risk and stop as safely as possible under the vehicle and carrier procedure. Do not remove a pressure cap while the system is hot. A dashboard warning does not make it safe to open a pressurized cooling system.
6. Check both air-pressure circuits and the warning device
On an air-braked vehicle, verify that the installed gauge or gauges are visible and that both service circuits build pressure. Watch for unequal response, a needle that stops, unexplained loss or a warning that fails its required test. Then complete the full air-brake test for the vehicle; a normal-looking parked gauge is not a substitute for leakage, warning, spring-brake and service-brake checks.
For power units not originally subject to FMVSS 121, section 393.51 requires a continuous audible or visible warning at 55 psi and below, or one-half the governor cutout pressure, whichever is less. Vehicles subject to a Federal Motor Vehicle Safety Standard follow the standard applicable on their manufacture date. That is why the skills-test procedure and truck requirements—not a social-media shortcut—must control the exact test.
7. Separate ABS prove-out from foundation-brake condition
Check the tractor ABS lamp and, when applicable, the trailer ABS indicator path. A lamp that remains on after the vehicle's normal prove-out indicates an antilock-system malfunction. Federal ABS requirements vary by vehicle type and manufacture date, including in-cab trailer malfunction signaling on certain towing vehicles.
An ABS warning does not prove that the foundation brakes are inoperative, and a dark ABS lamp does not prove every brake component is safe. Inspect and test the complete braking system, report the lamp status accurately and follow the applicable repair or out-of-service decision. The ABS guide explains the tractor and trailer indicators in detail.
8. Scan instruments while driving without staring at them
Once moving, keep most attention on the road, mirrors and changing traffic scene. Add brief gauge checks to the visual-search cycle, especially after startup, after a fuel stop, on a grade, after a major change in load or weather, and whenever the vehicle behaves differently. The current New York CDL manual advises drivers to check instruments, air pressure, temperature, pressure and charging gauges regularly during a trip.
Compare related evidence. A rising coolant gauge plus reduced power, a charging warning plus dim lights, or falling air pressure plus a buzzer is more urgent than a single unexplained flicker. Never photograph, search or troubleshoot a dash message while the truck is moving. Get to a safe location first.
Use a three-level response instead of guessing
| Condition | Examples | Driver response |
|---|---|---|
| Normal information | Expected prove-out, parking-brake lamp with brake applied, stable readings in approved ranges | Continue the inspection and record the truck's baseline |
| Investigate before movement | Unknown icon, implausible fuel or DEF level, one gauge not responding, unexpected message | Identify the signal, repeat only approved checks and contact maintenance or dispatch |
| Stop or shut down safely | No oil-pressure response, overheating, serious brake warning, falling air pressure or smoke/odor with an electrical warning | Control the vehicle, reach a safe location if movement is necessary, secure it and follow emergency or shutdown procedure |
A warning's color is useful, but color alone is not the decision rule. Read the actual message, consider the gauge trend and use the manufacturer's instructions. Never erase a warning by cycling the key repeatedly and then treat the system as repaired.
Practice a precise CDL dashboard explanation
Use a consistent order and speak only to the equipment installed. For example: “With the parking brake applied and the transmission in neutral, I complete the key-on lamp prove-out, start the engine and confirm oil pressure rises promptly. The charging indication is normal, coolant temperature rises gradually, both air circuits build normally and the required warning lamps and buzzers respond according to this vehicle's procedure. I will continue to monitor the gauges during operation and stop and report any unsafe reading or warning.”
Pair that explanation with a physical point to each instrument. Avoid memorizing decorative numbers that do not match the training truck. State testing procedures vary, so use the current State manual and examiner instructions while keeping the safety logic intact.
Practical takeaways
- Identify every installed gauge, lamp, buzzer and message before you need it.
- Observe the key-on prove-out and know which indicators may remain on for a valid reason.
- Watch oil pressure respond immediately after startup; do not rev an engine to manufacture a reading.
- Use manufacturer ranges and the truck's stable baseline for oil, coolant and charging systems.
- Check both air circuits and complete the full air-brake test rather than relying on one dash glance.
- Treat ABS lamps as system-status information, not as proof that all brakes are good or bad.
- Scan gauges briefly while driving and investigate any change supported by sound, smell, feel or performance.
- Report the exact instrument, reading or message, operating condition, trend and time observed.
CDL dashboard gauge FAQ
What dashboard readings are normal on a Class 8 truck?
There is no single set of normal numbers for every truck. Engine design, electrical architecture, brake system, ambient temperature, load and operating state all matter. Learn the manufacturer ranges and the stable baseline for the assigned vehicle, then investigate readings outside those limits or a meaningful change from that baseline.
Should every warning light go out after the engine starts?
Many system lamps illuminate briefly for a prove-out and then extinguish, but the exact sequence is vehicle-specific. A parking-brake lamp can remain on while the brake is applied, and some indicators describe a selected operating condition rather than a failure. Use the vehicle manual and do not dismiss an unfamiliar lamp.
What should I do if oil pressure does not rise after startup?
Do not raise engine speed to force a reading. Follow the vehicle procedure, shut the engine down when required and report the condition. Confirming the oil level before startup does not prove that the lubrication system is building pressure.
At what pressure must the low-air warning activate?
The federal rule requires an air-pressure gauge and warning signal, but the applicable threshold depends on the vehicle manufacturing standard. For power units not originally subject to FMVSS 121, 49 CFR 393.51 specifies a continuous warning at 55 psi and below, or one-half the compressor governor cutout pressure, whichever is less. Use the current State test standard and the vehicle requirements for the actual truck.
Can a driver operate with an ABS warning lamp on?
A steady ABS malfunction lamp does not automatically mean the foundation brakes have stopped working, but it does mean the antilock system needs attention. Complete the normal brake checks, report the fault and follow carrier, manufacturer and applicable out-of-service instructions before moving.
How often should a CDL driver scan the gauges?
Check them deliberately during startup and before movement, then include them in brief instrument scans while driving and whenever the truck sounds, smells, feels or performs differently. Keep most attention outside the vehicle; a gauge scan should be short and purposeful.
Turn every startup into a baseline check.
Learn what normal looks like on the assigned truck so a small change becomes useful information—not a surprise on the road.
Start free CDL practice